Appendix D: Content Management with Bricolage
This appendix was kindly written for this book by David Wheeler, Bricolage Maintainer, david@wheeler.net.
As your site grows, the amount of content to be managed grows. At some point -- particularly if you're part of a large organization with a lot of pages on its site -- the amount of content that needs to be continually updated becomes unwieldy. Most sites start out with one or two people doing everything manually in a text editor and then FTPing the files to the web server. As the demands on the site grow, savvy site operators discover and deploy flexible templating systems such as Mason to ease the demands of site management.
However, for all its flexibility and power, Mason still requires manual updates to its files. By using Mason, you may reduce the number of files you have to edit every time your marketing department wants to change its message from "adaptively monetizing holistic market-driven systems" to "utilizing proactive meta-services,"1 but wouldn't it be nice if the marketing department could make those changes itself, without having to bother you? And wouldn't it be helpful if the interface for making those changes was simple enough for every user in your organization to comprehend and use?
Content management systems (CMSs) endeavor (or at least claim) to respond to such wishes. The CMS market is a packed one, with entries from startups to established industry players. But if you're reading this book, it's safe to assume that you'd be most interested in a Perl-oriented, or perhaps even Mason-oriented, CMS.
Bricolage is such a CMS. It is built on Mason, and you can use it to build large Mason-powered sites as well as sites driven by other technologies.
The idea behind a CMS is to centrally manage content in such a way that any user who needs to edit text, graphics, or other media can do so through a structured interface. The presentation of content for editing is independent of the final format of the content or of the distribution of the content to your site. All such content is managed by a version control system, so that its history can be reviewed and the content rolled back to an earlier version if necessary. Furthermore, content moves through a workflow that subjects it to various stages of review and approval before publication and distribution. And when published, the CMS formats the content for output by pushing it through content-independent formatting templates created for that purpose. (See the Bricolage Terminology sidebar, later in this chapter, for definitions of some of the terms carelessly littered throughout this paragraph.)
These features form the foundation for Bricolage, a robust, actively developed open-source CMS built to centrally support a distributed organization of content and formatting specialists via an intuitive, browser-based interface. By rigidly separating content from formatting, Bricolage allows nontechnical users to quickly update and publish content relevant to them without having to coordinate with the production folks for formatting in HTML or with IT for getting the content on the site. Rather, a marketing wordsmith or copy editor can search for and check out the "story" (as text-based Bricolage content is called) that needs changing, make the changes, and then check in and possibly publish the story. Bricolage handles formatting the story, writing it to a file, and distributing the file to the production web server -- all without the alignment of stars that a traditional, hand-maintained infrastructure requires.
A brief introduction to Bricolage follows, including the basics of installation and configuration, terminology, element administration, content editing, and template development. Although Bricolage offers many more features than those presented here (indeed, comprehensive documentation of Bricolage could fill its own book!), the majority of your and your users' time will be spent on these tasks. And don't worry, we'll soon get to the importance of Mason for formatting content. So let's install it and get going!
Installing Bricolage
Bricolage is a complex application with a long list of requirements. Nevertheless, it strives to make installation and configuration as painless as possible. The key to an easy Bricolage installation is to get its requirements satisfied ahead of time. The Bricolage installation process does its best to verify those dependencies and to suggest what you need to complete the installation.
To get started, download Bricolage from its home page, http://www.bricolage.cc/, and unpack it. Bricolage uses a standard make process for its installation, so simply execute the following:
  cd bricolage-1.x.x
  make
The first thing the make process does is verify that you have all the necessary software requirements
satisfied. Thus it's a convenient first step since, based on its printout,
you'll know very quickly what it needs installed that's not already on
your system.
Fortunately, the list of requirements consists of well-known and widely deployed applications and libraries. Indeed, some of the more popular GNU/Linux distributions, notably Red Hat and Debian, are compatible with Bricolage. Binary RPMs and DEBs can be used to install Perl, Apache, and PostgreSQL on those platforms, and Bricolage supports FreeBSD and the ports-installed versions of Perl, Apache, and PostgreSQL, too. Bricolage even runs well on Mac OS X! Consult the platform-specific README files that come with the Bricolage distribution and the INSTALL file for detailed installation instructions.
Here's a quick overview of what you'll need to run Bricolage:
-
Perl
The first thing you'll need to run Bricolage is Perl 5.6 or later (5.6.1 is strongly recommended, since it fixes many bugs in 5.6.0). Although Mason supports earlier versions of Perl, Bricolage's design and many of its key features demand the feature set provided by Perl 5.6. To compile and install Perl yourself, download it from http://www.perl.com/ and follow its installation instructions.
-
PostgreSQL
Bricolage stores the vast majority of its data in a PostgreSQL database.
PostgreSQL is a well-respected open source RDBMS with an impressive feature set. Download PostgreSQL 7.1 or later (Version 7.2 or later is strongly recommended) from http://www.postgresql.org/. If you're installing it manually, be sure to compile it with the
--enable-multibyte=UNICODEconfiguration option, as Bricolage stores all text in Unicode character encoding. -
Perl modules
Bricolage provides a comprehensive feature set thanks in large part to the benefits of the CPAN. As a natural result, Bricolage requires quite a lot of CPAN modules to be installed -- more than 30 as of this writing. The simplest way to install them all is to let Bricolage's
makeprocess use theCPANmodule to download and install everything for you. If you don't have dedicated Net access while runningmake, check the INSTALL file for a list of the required modules you'll need to acquire and install. -
Apache/mod_perl
The Mason-powered Bricolage user interface is browser-based. It therefore requires the Apache web server and
mod_perl. The process for installing Apache andmod_perlto work with Bricolage is no different than your typical install, so if you've already installed Apache andmod_perlfor Mason, it should also work fine for Bricolage. Note that at the time of this writing, Apache 2.0 andmod_perl2.0 have not been tested with Bricolage; you'll need to install the latest 1.3 Apache and 1.xmod_perl. You can also optionally include support for secure sockets (e.g.,mod_ssl) in your Apache install. Doing so allows Bricolage to encrypt passwords for logging in and even provides an option to encrypt all requests, so that remote users can protect all content they're editing. Downloadmod_perlfrom http://perl.apache.org/ and Apache from http://httpd.apache.org/. For SSL support use eithermod_ssl(http://www.modssl.org) or Apache-SSL (http://www.apache-ssl.org); both require the OpenSSL library (http://www.openssl.org).
Once all the preceding pieces are in place and functioning, return to the
Bricolage source directory and run make again:
  cd bricolage-1.x.x
  make
Once make has verified all of the necessary dependencies, it will prompt you for other
important information relevant to the installation, such as the Apache
username, the PostgreSQL administrator name and password, the name to be given
to the Bricolage PostgreSQL database, and the name and password of the
PostgreSQL user for Bricolage itself to use. Consult the INSTALL file for more information on the options these prompts set. Once you've
successfully answered all of its questions, make will finish its job and you'll be ready to install Bricolage. You must run make install as root:
  su
  make install
The installation will take care of everything that needs to be done, including copying the necessary libraries, Mason components, and configuration files to their destinations and creating the Bricolage database.
Now it's time to start Bricolage. Bricolage comes with a startup script, bric_apachectl, which reads the necessary configuration files, sets the Apache directives it needs, and fires up Apache. Use this command to start Bricolage:
bric_apachectl start
Once Bricolage starts, point your browser to the server name you specified during installation and log in. The default user is "admin" and the password is "change me now!" I strongly recommend that you take that advice. In fact, the admin user is a simple default user; you can create a new user in the Global Admin group for yourself, log out, log back in as the new user, and delete the admin user altogether if you like. Better yet, just change the login name of the admin user.
Elements: the Building Blocks of Content
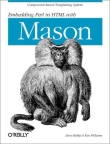
The core of the Bricolage interface is managing different types of assets through a workflow process. When you log in, Bricolage presents you with your own private workspace. Any story, media, or template assets that you have checked out are listed here (see Figure D-1), providing easy access for you to edit them, check them in, view their event logs, or delete them. You can also preview a story or media asset -- see how it will look when it gets published -- by clicking its title. You can sort the assets by many of their properties, including title, category, cover date, and priority. The navigation menu on the left side of the screen presents a hierarchical view of the workflows and administrative tools available for your use.
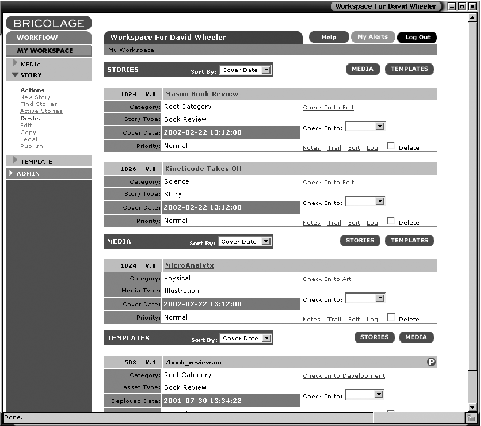
Descending through the ADMIN => PUBLISHING => Elements menus presents the Bricolage Element Manager (Figure D-2). The Element Manager, like all of the Bricolage managers, provides an interface to search for existing elements for editing or deletion as well as a link to create new elements. Selecting to edit an element, such as the default-installed "Book Review" element, brings up the Element Profile (Figure D-3).
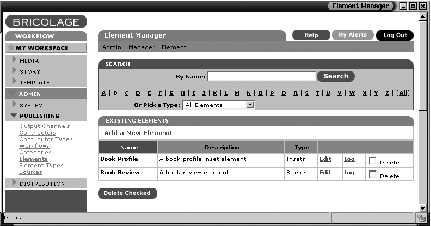
Figure D-2. The
Bricolage Element Manager
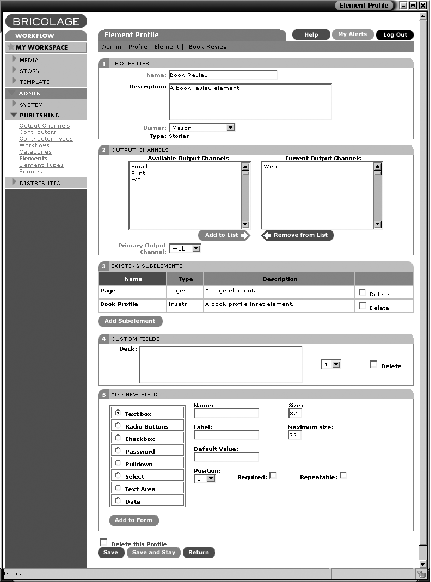
Figure D-3. The
Book Review story type Element Profile
There are essentially three types of elements in Bricolage: those that define stories, those that define media assets, and subelements of either stories or media assets. The "Book Review" element shown in Figure D-3 is an example of an element that defines the structure of a story, hereafter called a "story type element."
Figure D-3 reveals a multitude of relevant data points that describe stories based on this element. In the first section of the profile, the "Burner" select list determines what kind of template will be used to "burn" the content of "Book Review" stories into files. The options supported as of this writing are Mason and HTML::Template . This means that the templates that format the content of "Book
Review" stories are actually Mason components! Other templating
architectures may also be added by the time you read this, but isn't it
fortuitous that Bricolage already supports our favorite?
All story type and media type elements are set to publish to particular output channels. An output channel is a named collection of templates used to output the content of a story in a particular way. For example, in Figure D-3, notice that the "Book Review" story type element publishes to the "Web" output channel. Other output channels available to this element are "Email," "Print," and "WAP." Should any of these be added to the "Book Review" element, upon publication a story built from the "Book Review" element will be formatted by templates specific to each output channel. In this way, it's possible to publish the same content in multiple ways and to multiple destinations -- a useful feature for maximizing the reach of your content. For example, adding the "WAP" output channel and publishing a story based on the "Book Review" element would format and distribute the content of the story for both the Web and for WAP phones. Bricolage allows you to create as many output channels as necessary to get your content where it needs to go. You'll then just have to create the templates for them (see "Templates" later in this chapter).
Examining sections 3, 4, and 5 of the Element Profile, you'll notice that Bricolage provides for a great deal of element customization. Section 3, "EXISTING SUBELEMENTS," lists subelements of the "Book Review" element. This list derives from all of the non-media type and non-story type elements in Bricolage. Furthermore, subelements can themselves contain subelements. In this way, one can create a structured hierarchy of elements, and this hierarchy can be as arbitrarily deep as necessary. In this example, "Page" and "Book Profile" have been added as subelements of the "Book Review" story type element. Thus, a content editor building a story based on the "Book Review" element will have a choice of adding page and book profile subelements. This componentized architecture closely mirrors Mason's idea of assembling a page from a library of components -- in fact, if you use the Mason burner, every element has a one-to-one relationship to a Mason component.
Sections 4 and 5 of the "Book Review" story type element profile illustrate Bricolage's support for custom fields. As an element administrator, you determine what fields need to be in an element, the default order in which they appear, and whether they're required or repeatable. Note that one field -- Deck -- has already been added. By using the form in section 5, you can add more fields and make them any of several familiar types: text box, radio button, checkbox, select list, and so on.
The key to element administration in Bricolage is to think of it in terms of logical data modeling. Think about how meaningful aggregations of content (e.g., stories or pages) on your site are structured, and then create the necessary elements and subelements to model those structures. Then, when content editors create the content, they'll be presented with only the choices of elements and fields that adhere to the models you create for them. In this way, not only do you provide an intuitive interface for your content editors to work with, but you also assure the integrity of the resulting structure's content.
Content Editing
Once you have designed your element hierarchy to meet the needs of your content editors, those editors can start to create content. Figure D-4 illustrates a typical story profile, this one for a story based on the "Book Review" element we examined in the last section. Note that the value for "Story Type" is "Book Review." In the content editing space, the elements that define stories and media assets are called "story types" or "media types," respectively, while all other elements are simply called "elements." This distinction prevents confusing your editors about the difference between elements that are subelements and elements that define stories or media.

Figure D-4. A
story profile for a 'book review' story
The first section of the Bricolage story profile, "INFORMATION," lists properties of the story common to every story in the system. In addition to the aforementioned "Story Type" property, notice the "URI" property. Bricolage constructs this property from the primary category of the story, the story's cover date, and its slug. The cover date is an arbitrary date with which to associate the story, while the slug is a kind of one-word description. Categories, discussed later, make up the directory structure of your site. Notice that the slug and cover date can be edited; whenever you change any of these values, Bricolage will automatically update the URI. Previews are an important function of the URI in the story profile; click the URI to see how the story will look once it has been formatted by its templates and published.
Other properties managed in this section include the story's source (where the content comes from) its title, a description, and the expire date. The expire date is particularly useful, as Bricolage's distribution architecture will automatically delete the story from your site on this date -- a critical feature for time-sensitive content.
The second section of the story profile, "CONTENT," provides the interface for building the meat of your content. The element hierarchy mapped out in the "Book Review" story type element profile defines the structure of this section. The "Add Element" button and the select list next to it offer the elements that one can add to this story. Note that in the interest of simplicity, the "Add Element" select list offers both subelements and custom fields as options -- the two concepts are not distinguished in this interface. The reason for this simplification is that editors don't really care whether something they're adding to the story is a subelement or a field; they just know they need to add something -- a deck, a page, a book profile, and so forth. So all they have to do is pick something from this list and then click "Add Element" -- no need to stop and think about whether the thing they want to add is a field or a subelement, because everything is in one place.
A "Deck" and two "Page" elements have been added to the sample story in Figure D-4. Custom fields such as "Deck" display the values that the editor has put in, while subelements such as "Page" provide buttons to edit those elements. The "Position" select lists allow the editor to easily reorder the elements she has added to the story, while the "Delete" checkboxes allow her to remove nonrequired elements she no longer wants.
Sharp readers will have noticed that there are in fact two edit buttons associated with each "Page" element, "Edit" and "Bulk Edit." The "Edit" button presents the editor with an element profile. The element profile essentially mimics the "CONTENT" section of stories, listing the subelements and fields that have been added to the element. Figure D-5 illustrates the element profile for the first "Page" element in the story profile displayed in Figure D-4. The usual "Position" and "Delete" options are once again available, as is the ability to add more elements. Note that three paragraphs have been added to this element. While it makes sense to add some elements one at a time -- particularly those that can be added only once, such as the "Deck" field in the story profile -- adding a repeating field over and over disrupts the editing process. No editor wants to interrupt his editing every time he has to start a new paragraph by stopping to select "Paragraph" from the select list, click "Add Element," wait for the page to reload, scroll down to find the new field, and then continue with his writing.
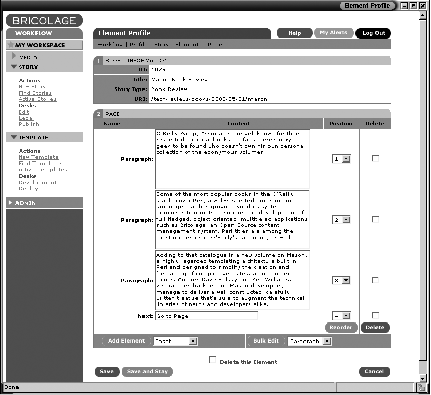
Figure D-5. A
page element profile
The "Bulk Edit" button addresses this issue. The select list next to the "Bulk Edit" button lists fields that can be added multiple times to a story -- in this example, "Paragraph." Notice that each repeatable element listed in the story profile illustrated in Figure D-4 has a "Bulk Edit" button. The element profile duplicates this interface, so that an editor can jump straight from a list of elements to the bulk edit page for one of the repeatable fields in one of the elements or can edit the element itself in its profile and bulk edit its repeatable fields from there.
Figure D-6 illustrates the result of selecting "Paragraph" and clicking the "Bulk Edit" button. This interface allows an editor to edit contiguous fields, well, contiguously -- without having to interrupt her train of thought to deal with managing the architecture of the story. She may choose to use whatever field separators she likes (the default is a blank line) and gains the added benefit of word and character counts. In fact, the bulk edit interface is smart enough to properly wrap broken and mangled lines pasted from another application, such as an email client or word processor.

Figure D-6. Bulk
editing paragraphs in a page element
Let's return to the story profile in Figure D-4. The third section, "CATEGORIES," manages the categories in which the story will be published. Each category defines a directory on the filesystem, and because categories may contain subcategories, you can easily construct a meaningful hierarchy for the content on your site. In Figure D-4, the category /tech/reviews/books has been selected, and you can tell from the URI path that it is a subcategory of /tech/reviews, which is itself a subcategory of /tech, which in turn is a subcategory of the permanent / root category. Upon publication, the story will be written to files in this category, as reflected in the full URI of the story listed in the "INFORMATION" section of the story profile. You can add a story to multiple categories, and it will be written to all of those categories when published. This feature is useful for stories that cut across categories and when the categories are formatted differently by their templates. Multiple categories can even be useful for designating different sites. In that sense, selecting multiple categories forces the story to be published to multiple sites. One category is always designated as the primary category and will be used as the default for previews and for searching for an existing story in Bricolage.
The last section of the story profile defines associations between the story
and other objects in Bricolage -- namely keywords and contributors. Keywords
are exactly what you think they are: keywords associated with the story. Most
often these will be used for creating a keywords metatag in your story HTML files, but it can also be used for archiving,
indexing, search engine populating, and so on. Contributors are the people who
contributed content to a story. Bricolage offers comprehensive features for
managing contributors, including the ability to create types of contributors,
to define custom fields for those types (e.g., "Bio"), and to create
variations (called "roles") on a given contributor within a type, so
that the same contributor can be used for different stories with different
information in his custom fields.
The button bar at the bottom of the story profile provides numerous options for managing the story. Click "Save" to save the story and return to your workspace. Click "Save and Stay" to save the story and continue editing it. Select the "Delete" checkbox and click "Save" to delete the story. Select a desk from the select list next to the "Check In" button, click that button, and the story will be saved and checked into that desk, incrementing the version number in the process. You can revert to a previous version of the story by selecting a version number from the select list on the right end of the button bar, and clicking "Revert." Click "View" if you just want to see what a previous version looked like. Click "Cancel" to return to your workspace without saving your changes, and "Cancel Checkout" to remove all the changes you made since you checked out (or created) the story and remove the story from your workspace.
Templates
Because this is a Mason book, I'm sure you're now saying to yourself, "Self, where's the Mason? I want to see some code!" This is the section you've been waiting for. You should have at least skimmed the other sections, though, because in Bricolage templates are closely tied to elements.
As mentioned earlier, non-media type elements in Bricolage are associated with
a "burner." A burner is merely a templating architecture available
for formatting your content. At the time of this writing, the list includes HTML::Mason and HTML::Template. In the element we examined earlier, the "Book Review" story type
element, the Mason burner was selected. Subelements of the "Book
Review" element were "Page" and "Book Profile," both
of which also use the Mason burner. Ultimately, this means that the templates
that format the content for these elements are Mason components.
Figure D-7 illustrates a template profile, book_review.mc, which formats stories created from the "Book Review" story type element. In Bricolage, templates, like story and media assets, are managed through workflow. You check them out, make your changes, and check them in. When you're ready to put them to work formatting your content, you deploy them from a workflow desk designated for that task. Managing templates through workflow allows an organization to manage an approval process when necessary, as well as create various stops that may be necessary to create templates -- e.g., from production (when somebody creates a raw HTML template) to development (when a Masonite adds the code to do the formatting) to deployment.
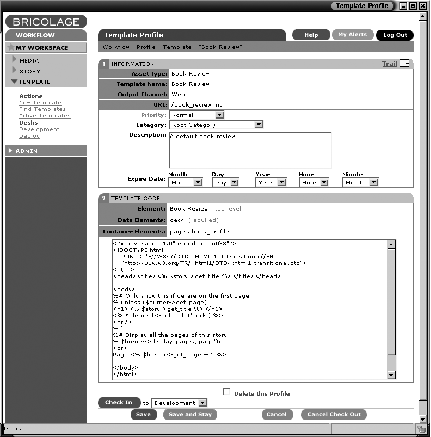
Figure D-7. A
book review template profile
In Figure D-7, you'll notice that the template looks pretty much like any Mason component. The difference, however, is that the Bricolage burner system makes a number of global objects available to the component. These objects are a $story object, which represents the story itself; an $element object, which represents the element that the template is formatting; and a $burner object, which represents the Bricolage burner executing the Mason template.
These objects provide all the methods you need to get and format story content.
The $story object, for example, allows you to access the primary properties of the story
being burned, such as (in this example), the title: $story->get_title. Here is the complete book_review.mc template code:
  <?xml version="1.0" encoding="utf-8"?>
  <!DOCTYPE html
      PUBLIC "-//W3C//DTD XHTML 1.0 Transitional//EN"
      "http://www.w3.org/TR/xhtml1/DTD/xhtml1-transitional.dtd">
  <html>
  <head><title><% $story->get_title %></title></head>

  <body>
  % # Only show this if we are on the first page.
  % unless ($burner->get_page) {
  <h1><% $story->get_title %></h1>
  <h3><% $element->get_data('deck') %></h3>
  <hr />
  % }

  % # Display all the pages of this story.
  % $burner->display_pages('page');
  <h4>Page <% $burner->get_page + 1 %></h4>

  </body>
  </html>
The $element object allows you to retrieve the custom data attached to the element
that's currently being formatted (remember, elements are hierarchically
created, so you can have many elements for a given story). The example
retrieves the contents of the "Deck" field from the story element: $element->get_data('deck'). The $element object also offers properties to retrieve the subelements added to the story.
Note that, in Figure D-7, the fields listed above the Mason code provide a cheat sheet listing what "Data Elements" (fields) and "Container Elements" (subelements) are available.
The $burner object provides special methods that allow you to affect the burn process
itself. In this example, $burner->display_pages('page') causes the burner to execute the relevant template for the "Page"
element for each page element in the story. Pages in Bricolage are elements of
a specific type that have been marked as pages in the UI (see Figure D-8). The "Page" element happens to be an element of an element type that's marked "Page" (makes sense, don't it?), so we can use the display_pages() method to burn "Page" elements. The burner is smart enough to find
the proper template and use it to format each page.
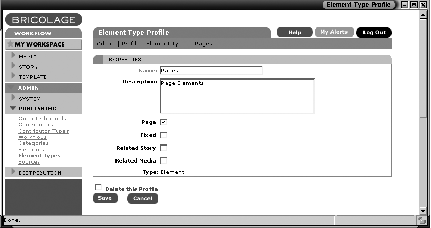
Figure D-8. The
'Pages' element type profile
The display_pages() method formats each page in the context of the template that calls it. Thus,
all of the Mason code on either side of the call to $burner->display_pages('page') is executed for every page in the story. This is similar to the Mason $m->call_next method in that the context of the surrounding code always remains intact for
each page; but unlike $m->call_next, $burner->display_pages writes each page of the story to a separate file. This functionality allows
the burner to determine how many pages a story has and how many to burn to the
filesystem without you as the template developer needing to worry about it. All
you need to do in that context is to determine the page number, when necessary,
to display contextual information that varies depending on the page.
The book_profile.mc template, listed earlier, does just that: because Bricolage elements are
ordered as a Perl array, the first page element is 0, the second page is 1, and
so on. Thus it's a straightforward matter to determine what page is
currently being burned and therefore what contextual data to display. Here, the
title and deck go on only the first page ($burner->get_page returns 0, or false), and page number labels get displayed by simply adding 1
to every call to get_page().
The page.mc template uses the same approach to add links to the different pages in a story. Here is a sample page.mc template:
<!-- Start "Page" -->
<%perl>;
# Display all elements except 'prev' and 'next'.
foreach my $e ($element->get_elements) {
next if $e->has_name('prev') || $e->has_name('next');
if ($e->has_name('paragraph')) {
$m->print('<p>'. $e->get_data . "</p>\n");
} else {
$burner->display_element($e);
}
}
$m->print("\n<hr />\n\n");
# Get file name info from the output channel.
my $oc = $burner->get_oc;
my $filename = $oc->get_filename;
my $file_ext = $oc->get_file_ext;
# $burner numbers pages from '0' not '1'.
my $pnum = $burner->get_page + 1;
# Show 'previous' link
if (my $prev = $element->get_data('previous')) {
my $pageindex = $pnum-2 != 0 ? $pnum-2 : '';
my $prev_pnum = $pnum - 1;
$m->print(qq{<p><a href="$filename$pageindex.$file_ext">}
. qq{<-- $prev $prev_pnum</a></p>});
}
# Show 'next' link
if (my $next = $element->get_data('next')) {
$m->print(qq{<p><a href="$filename$pnum.$file_ext">}
. qq{$next --></a></p>});
}
</%perl>
<!-- End "Page" -->
The first thing you'll notice is a new method call, $element->get_elements. This method returns a list of all the subelements and field elements of the
current element in the order specified by the editor in the story profile. Note
that in this template the $element object represents the "Page" element currently getting burned,
rather than the story type element; the global $element object always represents the current element relevant to the template. Since the elements
returned by $element->get_elements can be either subelements or fields, we use has_name() to check each one so that, based on our knowledge of the story structure, we
can decide what to do with each element.
In this example, we choose to skip the 'next' and 'previous' elements because they'll be handled later. The ' paragraph' elements, on the other hand, are formatted as one would expect, while any
other elements are merely passed to $burner->display_element. This method, like the display_pages() method, finds the relevant template for the element, formats the element, and
adds it to the output of the template. It differs from the display_pages() method in that it doesn't output a separate page for each element. In this
respect, it somewhat resembles Mason's $m->comp method, although it takes no other arguments.
The rest of the page.mc element is given over to creating links to the previous and next pages of the
story. Bricolage outputs all pages according to a strict set of rules: a) all
pages for a single story are in the same directory; b) each file is named
according to the filenaming properties of the current output channel; and c)
pages 2 and up get a number attached to the base name of the file. So if the
current output channel has its 'filename' property set to 'index' and its 'file_ext' property set to 'html' , the filenames of a story will be index.html, index1.html, index2.html, and so on. The previous page.mc template draws on this knowledge to create links to the previous and next
pages in the story -- if, that is, the story editor filled in values for the 'next' or 'previous' fields.
Figure D-9 illustrates the result of previewing the story shown in Figure D-4.
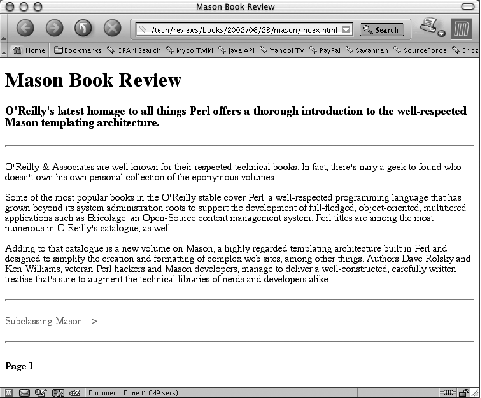
Figure D-9. A
preview of a book review story
Where to Learn More
Although the componentized architecture for building and formatting content constitutes the core functionality of Bricolage, this brief introduction has but scratched the surface of what's possible in this flexible application. Element design and implementation is an art of its own, and the templates, of course, feature all of the flexibility and power of Perl. But there's more. Bricolage offers a vast array of features commonly found in commercial CMSs. Here's a partial list of some of the features not mentioned earlier:
- Autohandler-type templates
- Scheduled publishing
- Content files distributed to production web servers
- Event-based alerting
- Filtering actions applied to content files
- Complete user and group administration
- A fine-grained permission architecture
-
A SOAP server for:
- Importing and exporting assets
- Automatically publishing content
- Mass publishing content
- Loads of other things no one has even thought of yet
To learn more about Bricolage, visit its home page, http://www.bricolage.cc/ . There you'll find user documentation to help get you started, the complete API documentation, more screen shots, and links to downloads of the latest version. There are also active discussion lists (and their archives) for Bricolage users and developers. Feel free to join the fun!
Footnotes
1. Thanks to Tels' Dev::Bollocks module for these lovely aphorisms. -- Return.
These HTML pages were created by running this script against the pseudo-POD source.